
LAUNCH OF THE EDSC FEASIBILITY STUDY CONSULTATION

The European Commission is exploring the development of a European Digital Skills Certificate (EDSC) to help people have their digital skills quickly and easily recognised by employers, training providers and more.
To do this, the JRC is carrying out a Feasibility Study of the European Digital Skills Certificate, as Action 9 of the Digital Education Action Plan (2021- 2027) – JRC/SVQ/2022/OP/0013. The study will allow for the analysis of the needs and design of the EDSC and governance option that best meets the needs of the stakeholders across the EU, ultimately generating valuable recommendations for EDSC implementation.
As an EDSC Ambassador and active member of the Digital Competence Certification Community of Practice, Learnable supports the goals of the European Skills Agenda through the development and testing of education and training European projects focus on digital skills.

We therefore invite all interested stakeholders to take part in this public consultation by participating in the two online surveys have been launched in parallel with the objective of respectively collecting information on national and regional digital competence certification and digital competence development policies and training offers leading to a certification in EU27 Member States.
The surveys are, respectively, directed to public authorities and policy-makers at the national, regional and local level working in the fields of education, digitalisation, and employment, and to education and training providers.
They will be open until the 23rd of January 2023.
To participate and receive the link to the surveys, you need to register at https://edsc-consultation.eu/register/. You will then receive a personal link by e-mail to participate in the surveys.
How to create a MOOC for free: the definitive guide to Thinkific
How to create a MOOC for free: the definitive guide to Thinkific
Many visitors come to our page searching for information on how to create an online education course. We, at Learnable, are constantly experimenting with solutions, tools and platforms for creating online courses, so we think this guide might be helpful for many of you .
This guide includes all the information you need to create and manage a free MOOC with Thinkific from A to Z. You can choose to read it in its entirety, bookmark it for future reference or simply take a look at the parts that really interest you.
If your only interest is to create MOOC for free, the second chapter will be more than sufficient.
We ask you a small favour
If you find this guide useful, please share it. In this way, you will extend its usefulness to others and help create a support network for all those interested in the subject.
To share it, click on the buttons below. Thank you very much!
#1 Why create a MOOC and why choose Thinkific
Whether you are a trainer, a teacher, a training provider or simply someone who wants to transfer your knowledge to others – a MOOC is perhaps the best solution, capable of reaching a multitude of users by providing them with a flexible system, adaptable to their time and habits.
Today, creating a MOOC does not require any special technical knowledge. As you will discover in point two, you can create and publish a MOOC in minutes and without spending any money.
There are a number of solutions that will suit you, but with this guide we would like to focus on using Thinkific for the following reasons:
– First of all, we can tell you that Thinkific is one of the few platforms that allows you to create a MOOC for free by providing you (also for free) hosting space to publish your MOOC and a system to manage your earnings if you intend to sell your course.
– You don’t have to download, install or manage anything. All you need is an internet connection and a little patience to learn how to use the interface.
Against this potential, if you want to use the platform for free, there are some limitations:
- you can only create one MOOC
- you cannot add more than one admin to collaborate in the creation and management of your MOOC.
- You are some limitation in the design and technical features
The free pricing plan is perfect for someone new to creating a MOOC, a teacher who wants to create a MOOC for their students or anyone who wants to try their hand at creating an online course. As your needs grow, you can easily access additional services and benefits with pricing plans that suit your needs. The free option is a great way to start
#2 How to create a MOOC with Thinkific
Go to Thinkific.
After creating your account and explored what you can do (there is a small video introducing you on Thinkific), you can start designing your course.

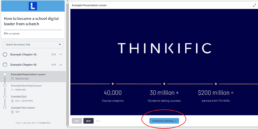
The Course Player is the course-taking environment – the part of your site where your students can go to watch your videos, take your quizzes, and more.

Just click on customise your course player to open the tab and start completing the following steps:
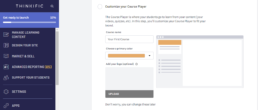
– Course name: write the name of the course you want to create (for example “How to create a MOOC for free”)
– Choose a primary colour: choose the primary colour of the Course Player. It will change the colour of the menu and other accents in the Course Player.

-In the free version, you cannot choose the fonts for your text, but you will use the default ones.
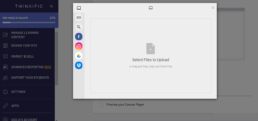
-Add your logo: click on “upload” for uploading your logo.
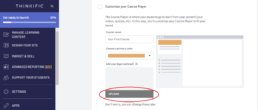
In the right column you have several options for uploading your logo. We suggest you to upload an image from your computer: for best results, we recommend uploading a PNG or JPG file under 250kb with dimensions 240×48 pixel.
– Click on “Save and continue”
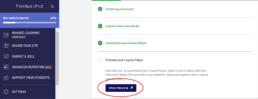
If you are not sure of the final layout, Don’t worry, you can change all these elements later.
By clicking on “Open preview” a demo based on your customisation will appear in another window. You can see how your course will look like, the different media, the structure and layout.
When you have finished exploring it, click on “Complete and Continue” and close the window.
It’s time to create your own course
You can continue with the guided procedure clicking on “Build your own course” and “Start building”

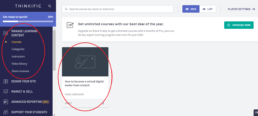
…or jump directly on “Manage Learning Content” > “Courses”. Here you should click on the course previously create.
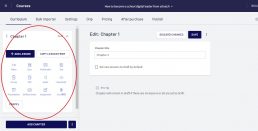
Your course will be organised in “chapters”. Any chapter includes different “Lessons”.
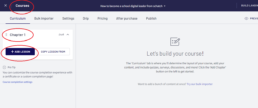
By clicking on any Chapter, you can change the chapters’ name. Make sure to flag “draft” box until you have the materials finalised.
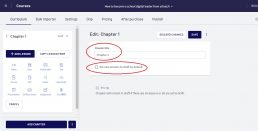
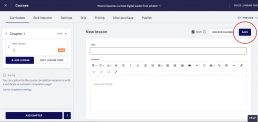
By clicking on “+ Add lesson”, you can create a lesson and choose the medium that best suits the learning needs of your students.
Thinkific is able to support a wide variety of content types such as Videos, Quizzes, Multimedia, Text, Surveys, PDF, Audio, Downloadable Files, Presentations, Quiz .You can use only one media per lesson.
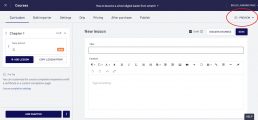
Once saved, every time you need it, you can explore a preview of your lesson (how it will be visualised by your learners)
Once created all your lessons and contents, you can set up the other details included in the tabs of this section. We will suggest you to focus on “Settings”, “Pricing” and “Publish”.
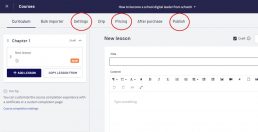
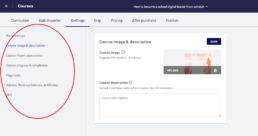
In the “Settings” tab, you can set up different details of your course. We would like to highlight the “Course Image & description” and the “Course progress & completion” sections.
In the “Course Image & description”, you can upload a course image. It will make your course more appealing.
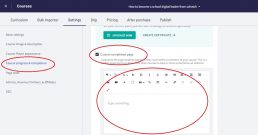
In the “Course progress & completion” section, you can set up a Custom completion page. This way, students see when they reach 100% completion of the course. This is a perfect opportunity to show them other courses to take or share follow-up material. In the free version, the “Certificate of Completion” is locked, but you can use this tab to share or download any certification or online badge you have prepared once the course is completed. If you want to know more about how to create an online badge for free, this article it may be useful.
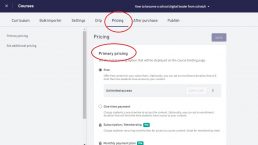
In the pricing tab, clicking on “primary pricing” you can choose if you want to deliver the course for free or to request a fee. In the first case, you can decide an enrolment duration that will limit the time students have access to your content.
In the second case, you will be redirected to the “setting” section for defining the payment methods.
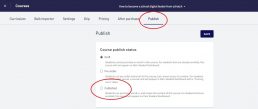
In the “Publish” tab, you can define the course status: draft, pre-order, published. When you click published, your students can purchase, enrol in, and access the content of the course. For students that are enrolled, this course will appear on their Student Dashboard.
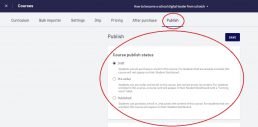
When finished, just save.
Now, you should start customising your site. To do it, you can open the menu “Design your site” on the left bar.

By opening the “Site Builder” app, you can customise contents and design of your pages.
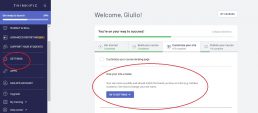
Clicking on “Home page”, you should firstly answer the question below.
For this example I chose “only one course” and then click on “Let’s go!”


At the moment, we will focus on the Home Page.
The customisation of the tabs “Home page” and Courses is more than sufficient for users approaching Thinkific for the first time. As you become more experienced, you will be able to set up all the other elements, if needed.
It is important to highlight the two main areas enabling the customisation of your pages: the “Pages” and “Theme Settings” tabs.
In the “Pages” tab, you can customise the contents and some structural elements, in the “Theme Settings” tab, you can customise the design of your pages.
Our suggestion is to define the contents and structure before (“Pages” Tab) and then the design (“Theme settings” tab).
In the “Theme settings”, we suggest you to choose one of the three pre-defined Styles included. They will change the page design in a consistent way. Then it will be more easy to set the single design features, if needed.

Now, you can start designing your Home Page.
This will include all your information and courses.
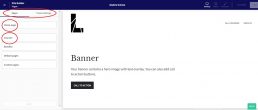
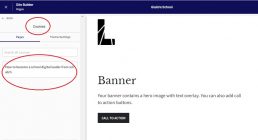
You can customise the header, the banner and the Product areas. They are the main 3 areas which will appear on your site. The header includes your logo and all the direct links you want to provide your learners (including the “Sign in” link).
The banner is the central part of your page and should include a description of your main proposal.
The last part includes a description of all your courses on Thinkific.
The very last part is the footer, which usually includes your contacts and social media, copyright notes and other links.
All the changes will be visible in real-time, so that you can explore and evaluate different solutions.
When you have finishes don’t forget to save the changes.
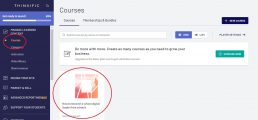
You can also create single pages for each of your courses. They are used for give to the learners an overview of your course and allow them to enrol. In most of cases if you want to deliver only one course you can focus only to this page. You should click on “Courses” and then on the course you want to create the page for.
Here you can customise four main areas: heading, banner, curriculum and footer. The curriculum will be automatically generated based on the chapters and lesson you included in your course and the related features.

By clicking on the “+ ADD SECTION” button you can include a lot of different sections and contents to your landing page.
When finished, save your settings.
At this point, go to “Settings” and customise your site’s details.
In this section, you can define some details about your site, payment method, sign up and other elements.
What you have done so far is sufficient for publishing your first MOOC.
Now, open the “Manage Learning Content” section, go in “Courses” and click on your course.
Click on the tab “Publish” and then on “Publish”. Now your students can purchase, enroll in, and access the content of your course.
#3 Creating a Thinkific course: extra content
Creating Thinkific courses can be simple or difficult. The difficulty lies in the degree of complexity of the course we want to create. If your want a simple MOOC it will be very easy to achieve your goals. If, on the other hand, you want to create a complex educational path, you will have to apply yourself and study a bit further.
Learning how to use Thinkific does not require technical skills such as programming, it just requires commitment and passion. Try to take this new activity as such, study how it works, be happy with your successes and in times of difficulty just keep learning.

How to create and issue an open badge for free
How to create and issue an open badge for free
In this article, you will understand what the open badge is, how to create it for free and what the benefits are for you, as an organisation, and for the learner. More importantly, we will provide you with a short tutorial and extra resources to help you create and deliver your own open badge in a few simple steps.
If you want to go directly to the section “How to create and issue an open badge”, click here.
1. What to know about badges
Open Badges, offered by the Open Badges Infrastructure (OBI), are the new digital tool for mapping, acquiring and valuing a variety of skills, knowledge and experiences, both inside and outside traditional educational contexts. Basically, they are an online visual representation of a skill you have earned.
They are packaged in a digital file, represented by an icon. The file contains the description of the badge, who issued it and the criteria required to receive it.
As mentioned before, the advantage of open badges is that they can also be issued by non-traditional learning institutions or experienced providers. This means that they can also be used by any kind of organisation that wants to provide a sort of certificaton/reward for learning experiences.
In addition, badges can be issued for learning or achievement in any subject, and can be:
- Skill badges, which focus on professional technical skills
- Knowledge badges, for the acquisition of knowledge, sometimes in preparation for the application of that knowledge in skills-based badges.
- Social or life skills badges, to recognise students’ efforts to develop social and life skills that are not typically taught in the classroom but are important for a successful life.
- Identity badges, to become a member of a community.
- Certification badges.
2. How to get started
If your open badges will be issued in an educational or training context, before you start, we suggest you consider the following steps when designing your learning pathway.
- Determine skill or achievement to recognise.
- Establish criteria based on which the badge will be awarded.
- Design and issue the badge via a digital credential platform.
This last step may take longer for an inexperienced organisation due to the variety of tools available on the Internet.
We suggest you use https://badgr.io because it is open-source, free, easy to use, and with no limitations in numbers of learners or badges. Furthermore, it gives the possibility to design your badges.
3. How to create and issue an open badge with Badgr
Create an account and then login: you can create an account with some apps you already use (google, facebook, etc..) or use your email address.

In this case, a verification code will be sent to your inbox. Once you write the code, press “continue”.

At this stage, you have to fill in the form below and “Create an Account”

You will be redirected to the main badgr page.
At this point, you should scroll down and click on “View Badgr backpack” or just click on “Badgr personal”.

This is your personal Badgr area, where you can find the badges awarded to you through Badgr or add other badges awarded by external issuers.

Then, you should click on “Issuers”.

Click “create Issuer”

Fill in the info required, upload your Logo which will be a jpeg file (optional) and click “Create Issuer”

Now you are ready to create your first badge. Click on “Create Badge”.

Fill in all the basic information required: the name of your badge, your badge image (.jpg file), description and earning criteria.
You can upload your badge image from your computer or you can choose to create an image directly on Badgr clicking on “design a badge”.

Once you are ready click on “Create Badge”.

Now your badge is created and it’s time to award it. If you want to award your badge one by one you can choose “Award badge” and fill in the required field (only email address and date are mandatory).
For multiple mailing you can click on “bulk award badge”, download the form and fill in it properly before uploading. The free Badgr version allows a maximum of 50 recipients per file.

The recipients will receive the badge via email. To fully exploit the potential of Badgr badges, the recipients should create a Badgr account. In this way, they will be able to download the badge, share it through social media and also print a certificate.
3. What are the benefits?
When accepted and used by all parties, open badges become a major channel of communication, establishing common standards and common language that define and describe personal and professional achievement.
For organizations, open badges help:
- identify quality professionals through recognized and substantiated skills and competencies
- monitor, support and evaluate the learning process
- build networks and connect organisations
For individuals, open badges are a way to:
- increase engagement in learning
- have a clear sense of its own learning progress
- serve as a good motivational mechanism
- display such skills and competencies, making them more visible in the job market.
4. Extra resources
Key badging terms
- Earner. An individual who satisfactorily meets badge completion criteria and is awarded the badge by the issuer
- Metadata. Every open badge is embedded with metadata including the badge name, description, criteria, issuer information, evidence, date issued, and other fields. Most badge issuing tools guide the issuer through the badge creation process and will indicate which fields of data need to be completed. Adding as much metadata as possible helps to increase the perceived rigor of each badge and its value to badge earners and consumers.
- Backpack. An earner-controlled digital repository that facilitates the collection, categorization, and sharing of open badges
- Issuer. The organization that designs and publishes a badge, reviews badge submissions, issues the badge to an earner, and provides digital verification of the badge’s authenticity
- Issuing Platform. A platform enables individuals and institutions to issue badges to their learners. In other words, if you want to give badges to your students, you create and upload your badges to an issuing platform, along with the criteria for earning the badge and a description of the badge.
- Open Badge Infrastructure (OBI). Open Badge Infrastructure—the technical standard for open badges developed by the Mozilla Foundation and maintained by IMS Global

The new EU Programme: Digital Europe Programme
The Digital Europe Programme
The Digital Europe Programme (DIGITAL) is the new European funding programme focused on bringing digital technology to businesses, citizens, and public administrations.
Digital transition is a key to Europe’s future prosperity and resilience. With a planned total budget of €7.5 billion (in current prices) over 7 years, the Digital Europe Programme (DIGITAL) aims to accelerate the economic recovery and shape the digital transformation of Europe’s society and economy, bringing benefits to everyone, but in particular to small and medium-sized enterprises.
How does it work?
The European Commission has adopted three work programmes for the Digital Europe Programme. The fourth work programme regarding High-Performance Computing actions will be prepared by the EuroHPC Joint Undertaking.
- The main work programme (“DIGITAL Europe Work Programme 2021.2022”), with a budget of €1.38 billion until the end of 2022, will focus on investment in the following areas:
- artificial intelligence (AI),
- cloud and data spaces,
- quantum communication infrastructure,
- advanced digital skills,
- wide use of digital technologies across the economy and society.
- The first specific work programme (“DIGITAL Europe – Cybersecurity Work Programme 2021 – 2022”) will focus on funding in the area of cybersecurity, with a budget of €269 million until the end of 2022.
- The second specific work programme (“DIGITAL Europe – EDIH Work Programme 2021 – 2023”) will focus on the set-up and operation of the network of European Digital Innovation Hubs, with a budget of €329 million, until the end of 2023.
The first calls will be published by the end of November.
The funding and tender opportunities web page gives you an overview of the calls for proposals (‘calls’) that are forthcoming or already open. Each call has its own call document, related to a particular topic. It gives more precise information on some of the issues that the European Commission would like you to address in the proposal.
The funding and tender opportunities web page hosts the services for managing your proposals and projects throughout their lifecycle.

4 instructional design models you should know: how to create effective educational pathways
4 Instructional design models you should know: how to create effective educational pathways
Having a blank page in front of you and starting to design an educational pathway from scratch is always a challenge, whether it is a whole curriculum, a project or just a few lessons.
The learners we address often have different needs, learning styles and objectives. To start planning our new training course can be useful to use codified instructional design models, well founded by years of research and practice.
Whether you are a trainer, lecturer or Instructional Designer, your primary goal is to create a course that is, at the same time, useful and engaging for your target group. It is always a pleasure to observe the increasing involvement of the participants, their curiosity about the topics taught and the good tests results at the end. Last but not least, we all love to receive good feedback from those who participate in our courses.
On the contrary, courses that do not fit the needs of our audience in terms of content and modalities generate frustration in both learners and trainers. We have all seen the blank stares of bored learners and no answer to the common statement “questions?” at the end of our lesson.
In order to have some guidelines for creating a successful educational path an Instructional Design Model (IDM) can be used. But what is an IDM?
It is a model that provides guidelines to organize appropriate pedagogical scenarios to achieve instructional goals. Instructional design can be defined as the practice of creating instructional experiences to help facilitate learning most effectively.
Below we present you 4 Instructional Design Models that you should know.
We have decided to suggest you two models suitable for students who want to learn (which is often the case of higher education contexts, corporate training and also in schools) and two for students who do not want to learn (as is sometimes the case in schools, vocational training, or any type of contexts in which pupils are forced to study something).
For students who want to learn
ADDIE MODEL
For many years now, educators and trainers have used the ADDIE Instructional Design (ID) method as a framework in designing and developing educational and training programs. Most of the modern models are based on this.
“ADDIE” stands for Analyse, Design, Develop, Implement, and Evaluate.
Analyse
It is the analysis of what the students already know and what they should know after completing the course. In the analysis phase the instructional goals, success metrics, and overall objectives are also established by analysing the background and needs of the students.
Design
In this phase learning objectives, instructional methods and activities, assessments, contents, lesson planning and media assets are outlined.
Develop
During this phase, what has been described in the design phase, is now created (contents, graphics, audio, videos, etc…). This phase includes three tasks, namely drafting, production and evaluation.
Implement
The training path is delivered. From the feedback and contributions received during this phase continuous improvements will follow.
Evaluate
The evaluation consists of two phases: formative and summative. Formative evaluation is iterative and is done throughout the design and development processes. This occurs all throughout the ADDIE process. Summative evaluation consists of tests that are done after the training materials are delivered.
The main aim is to evaluate to what extent the training accomplished its original goals outlined in the analysis phase.
ROBERT GAGNE’S NINE LEARNING EVENTS MODEL
The added value of this approach is its flexibility. It can easily be adapted to the different students’ learning styles and can be easily incorporated into Bloom’s Taxonomy concepts, and vice versa.
Gagne identified the mental conditions needed for learning.
The Nine Events of Instruction are:
– Gain attention of the students: with stimuli that catch and engage their brain (novel ideas or thought-provoking question, Asking unexpected questions, Bringing up an interesting point of trivia, Challenging students with a problem, Using a loud and unexpected tone or other audio stimuli, An eye-catching visual stimulus, Establishing a student-to-student exercise, etc…)
– Inform students of the objectives: Establish the expected outcomes and criteria for measuring achievement (tell them what we’re going to tell them, what they should expect, outline the concrete learning objectives and outcomes simply).
– Stimulate recall of prior learning: Leverage existing knowledge before introducing new knowledge and build on it (Doing a quick summary or review of past lessons, Prompting students to answer questions about things they learned before related to the subject, Asking the students to explain what they recall, Using engaging audio-visual presentations of material, Incorporating elements of prior-learned information into the new lessons, as a bridge from one to the other
– Present the content: Deliver the content in easily consumable chunks (include enough flexibility to allow for spontaneous discourse, use various delivery methods for your materials, include physical demonstrations and hands-on practice).
– Provide learner guidance: Guide them with examples, case studies, and other instructional support to supplement the content (provide an example of what a perfect outcome would look like for the purpose of the lesson and an example of what not to do, provide anything that helps the learner achieve their goal of understanding the lesson).
– Elicit performance: Give your students the chance to show you that they did their job and learned what you taught (Engage them with tests, quizzes, classroom presentations, essays, group projects, and hans-on activities, etc…)
– Provide feedback: Reinforce knowledge with immediate feedback (it should be personalized, constructive, positive, and immediate. )
– Assess performance: Test their knowledge with established (and transparent) criteria.
– Enhance retention and transfer to the job: Use content retention strategies (link concepts together, give creative assignments, be transparent about goals and learning outcomes, etc…)
For students who do not want to learn
MERRILL’S PRINCIPLES OF INSTRUCTION (MPI)
This approach is based on 5 main principles
Problem/task centred: This is a task-centred approach which starts with real-world problems or tasks. The baic assumption is that truly effective learning experiences are rooted in problem-solving.
Activation: Learning material should activate the previous knowledge the learner already has connecting it with the new one.
Demonstration: The trainer/ teacher should demonstrate the knowledge through different techniques (both visually and through story telling) with the aim to stimulate different regions of the brain, hence improving the retention rate.
Application: Learners should be allowed to apply the knowledge they have gathered on their own to solve problems. The educational paths should allow try and fail practices related to the topic considered.
Integration: Learners should be encouraged to integrate new knowledge into their life and use it to solve problems. The course must offer possibilities for integrating the knowledge into the learner’s world through discussion, reflection, and/or presentation of new knowledge.
ARCS MODEL – MOTIVATIONAL DESIGN
The acronym ARCS of the model and stand for Attention, Relevance, Confidence and Satisfaction (ARCS). The model was elaborated for encourageing and sustaining learners’ motivation through these four key elements in the learning process:
Attention: the first step in instructional design for motivation is to capture the learners’ attention through either perceptual arousal or inquiry arousal. The attention can be stimulated by using elements of novelty or surprise, by posing a question or presenting a challenge, or by offering up a problem for learners to solve.
Relevance: establishing relevance is accomplished by using an accessible language for creating analogies or stories to which the learner can relate. It can be done through Linking to previous experience, highlighting a present or future usefulness, presenting a model of success or giving learners choice upon their own instructional strategy.
Confidence: the motivation comes from the learners’ confidence that they can succeed and apply the new skills or knowledge. It can be done by encourageing learners to take small steps and immediately show them their progress, communcating clear learning outcomes, providing continous and constructive feedback, providing learners with some degree of control over the learning process.
Satisfaction: learners gain satisfaction from learning when they are able to apply their new skills, solve problems, and earn feedback and rewards that are meaningful to them. The learners’ satisfaction can be improved with some kind of rewards and the immediate application of the knowledge acquired in their life.

How to approach problems and learning: focused vs diffuse thinking
How to approach problems and learning: focused vs diffuse thinking
Researchers have found that we have two fundamentally different modes of thinking: “Focused” and “Diffuse” modes.
How Barbara Oakley and Terence Sejnowski said in their MOOC “Learning How To Learn”:
We're familiar with focusing. It's when you concentrate intently on something you're trying to learn or to understand. But we're not so familiar with diffuse thinking. Turns out that this more relaxed thinking style is related to a set of neural resting states.
Focused mode is a highly attentive state of mind where the brain uses its best concentration abilities to ignore all extraneous information. We use focused thinking when we are really concentrating on the matter at hand. It’s also the preferred method for studying knowledge-intensive subjects.
When we are in our focused mode of thinking, it’s like we have a one-track mind for the matter at hand. Distractions don’t exist. Focused mode allows us to zoom directly in on the most pertinent information.
Diffuse mode looks at the big picture. Unlike focused mode, diffuse mode happens when you let your mind wander freely, making connections at random. The diffuse mode let your brain free to connect the dots and link neural processes.
Usually, diffuse thinking happens as you do other things. While your conscious mind is relaxed, your brain is able to form a creative solution to a problem or finally link ideas that had been eluding you.
Based on the actual knowledge of neuroscientists you cannot be in both thinking modes at the same time.
It's kind of like a coin. We can see either one side, or the other side of the coin. But not both sides at the same time. Being in one mode seems to limit your access to the other mode's way of thinking.
When you’re learning something new, especially something that’s a little more difficult, your mind needs to be able to go back and forth between the two different learning modes.
Both are required in order to master a topic or make progress on a difficult project. After all, when you are learning something new, you need to understand both the context for the information (diffuse) and the specifics of the subject (focused).
Alternating between focused and diffuse thinking is the best way to master a subject or solve a difficult problem. First, we use the focused mode of thinking to understand the basics of a topic without any distractions. Then we use the diffuse mode to passively internalize what we have learned and make connections to other things we already knew. Afterwards, we go back into focused mode and pare down the connections that we made to the best, most helpful ones.
Once you have repeated this process a few times, the information will really stick.
In fact, too much focus removes our ability to reset the parameters or premise of the problem and blocks creativity.
That’s why when you’re feeling stuck or frustrated with a topic, it’s best to step back and take a break to let the diffuse mode run for a while. Too much diffuse thinking, on the other hand, will prevent you from ever getting the details of anything straight.
When you’re learning, what you want to do is study something. Study it hard by focusing intently. Then take a break or at least change your focus to something different for a while. During this time of seeming relaxation, your brain’s diffuse mode has a chance to work away in the background and help you out with your conceptual understanding.