

AI- Teach Handbook - First release
The first draft of the AI-Teach Handbook was produced in English version.
It is the main project result of the AI-Teach project, and it is dedicated to exploring the interdisciplinary use of AI-driven tools in primary education.
Tailored for primary school teachers and educators, the Handbook serves as a comprehensive guide, equipping them with essential knowledge and resources to integrate AI seamlessly into teaching practices.
The methodology for creating the document involved three main steps:
- Conducting focus groups in Italy, Poland, and Czechia to understand teachers’ needs for integrating AI tools into learning practices. 18 respondents, including primary school teachers, educators, and tutors, participated.
- The lead partner, Learnable, compiled the findings into a comprehensive report summarizing key insights.
- The structure of the Handbook was defined and shared with partners. Collaborative efforts among AI-Teach partners were then employed to develop the content, with each partner contributing based on their expertise.
The Handbook encompasses six key chapters:
- Foundational AI Concepts
- Ethical Considerations
- Methodological Strategies
- Subject-specific AI Resources
- Lesson Plans
- Case Studies
Each chapter is designed to empower educators with insights, practical strategies, and real-world examples, facilitating effective AI integration in educational settings.
Each chapter is designed to empower educators with insights, practical strategies, and real-world examples, facilitating effective AI integration in educational settings.
You can check out the English version using this link. Translated versions in the partnership languages will also be released shortly.
If you have any suggestions or changes to the document’s contents, please write to us at the following email address: roberta.accorroni@ictrilliniosimo.edu.it.
To stay updated on project developments, follow the project’s social media page on Facebook (AI-teach project) and website.
Enjoy the reading!
How to create a MOOC for free: the definitive guide to Thinkific
How to create a MOOC for free: the definitive guide to Thinkific
Many visitors come to our page searching for information on how to create an online education course. We, at Learnable, are constantly experimenting with solutions, tools and platforms for creating online courses, so we think this guide might be helpful for many of you .
This guide includes all the information you need to create and manage a free MOOC with Thinkific from A to Z. You can choose to read it in its entirety, bookmark it for future reference or simply take a look at the parts that really interest you.
If your only interest is to create MOOC for free, the second chapter will be more than sufficient.
We ask you a small favour
If you find this guide useful, please share it. In this way, you will extend its usefulness to others and help create a support network for all those interested in the subject.
To share it, click on the buttons below. Thank you very much!
#1 Why create a MOOC and why choose Thinkific
Whether you are a trainer, a teacher, a training provider or simply someone who wants to transfer your knowledge to others – a MOOC is perhaps the best solution, capable of reaching a multitude of users by providing them with a flexible system, adaptable to their time and habits.
Today, creating a MOOC does not require any special technical knowledge. As you will discover in point two, you can create and publish a MOOC in minutes and without spending any money.
There are a number of solutions that will suit you, but with this guide we would like to focus on using Thinkific for the following reasons:
– First of all, we can tell you that Thinkific is one of the few platforms that allows you to create a MOOC for free by providing you (also for free) hosting space to publish your MOOC and a system to manage your earnings if you intend to sell your course.
– You don’t have to download, install or manage anything. All you need is an internet connection and a little patience to learn how to use the interface.
Against this potential, if you want to use the platform for free, there are some limitations:
- you can only create one MOOC
- you cannot add more than one admin to collaborate in the creation and management of your MOOC.
- You are some limitation in the design and technical features
The free pricing plan is perfect for someone new to creating a MOOC, a teacher who wants to create a MOOC for their students or anyone who wants to try their hand at creating an online course. As your needs grow, you can easily access additional services and benefits with pricing plans that suit your needs. The free option is a great way to start
#2 How to create a MOOC with Thinkific
Go to Thinkific.
After creating your account and explored what you can do (there is a small video introducing you on Thinkific), you can start designing your course.

The Course Player is the course-taking environment – the part of your site where your students can go to watch your videos, take your quizzes, and more.

Just click on customise your course player to open the tab and start completing the following steps:
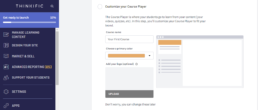
– Course name: write the name of the course you want to create (for example “How to create a MOOC for free”)
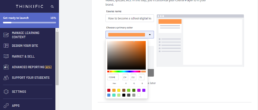
– Choose a primary colour: choose the primary colour of the Course Player. It will change the colour of the menu and other accents in the Course Player.
-In the free version, you cannot choose the fonts for your text, but you will use the default ones.
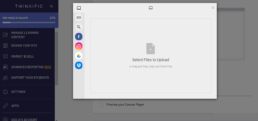
-Add your logo: click on “upload” for uploading your logo.
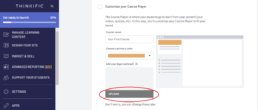
In the right column you have several options for uploading your logo. We suggest you to upload an image from your computer: for best results, we recommend uploading a PNG or JPG file under 250kb with dimensions 240×48 pixel.
– Click on “Save and continue”
If you are not sure of the final layout, Don’t worry, you can change all these elements later.
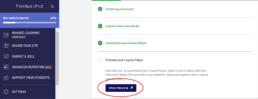
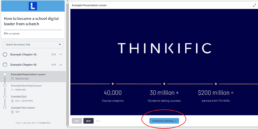
By clicking on “Open preview” a demo based on your customisation will appear in another window. You can see how your course will look like, the different media, the structure and layout.
When you have finished exploring it, click on “Complete and Continue” and close the window.
It’s time to create your own course
You can continue with the guided procedure clicking on “Build your own course” and “Start building”

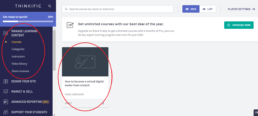
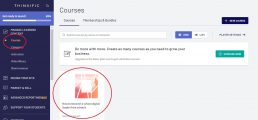
…or jump directly on “Manage Learning Content” > “Courses”. Here you should click on the course previously create.
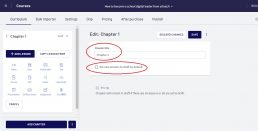
Your course will be organised in “chapters”. Any chapter includes different “Lessons”.
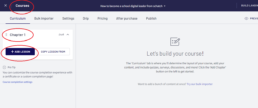
By clicking on any Chapter, you can change the chapters’ name. Make sure to flag “draft” box until you have the materials finalised.
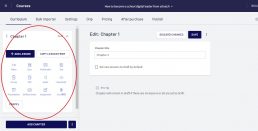
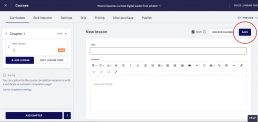
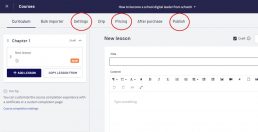
By clicking on “+ Add lesson”, you can create a lesson and choose the medium that best suits the learning needs of your students.
Thinkific is able to support a wide variety of content types such as Videos, Quizzes, Multimedia, Text, Surveys, PDF, Audio, Downloadable Files, Presentations, Quiz .You can use only one media per lesson.
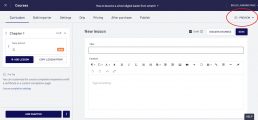
Once saved, every time you need it, you can explore a preview of your lesson (how it will be visualised by your learners)
Once created all your lessons and contents, you can set up the other details included in the tabs of this section. We will suggest you to focus on “Settings”, “Pricing” and “Publish”.
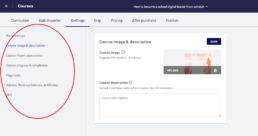
In the “Settings” tab, you can set up different details of your course. We would like to highlight the “Course Image & description” and the “Course progress & completion” sections.
In the “Course Image & description”, you can upload a course image. It will make your course more appealing.
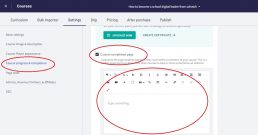
In the “Course progress & completion” section, you can set up a Custom completion page. This way, students see when they reach 100% completion of the course. This is a perfect opportunity to show them other courses to take or share follow-up material. In the free version, the “Certificate of Completion” is locked, but you can use this tab to share or download any certification or online badge you have prepared once the course is completed. If you want to know more about how to create an online badge for free, this article it may be useful.
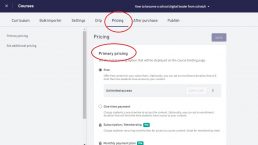
In the pricing tab, clicking on “primary pricing” you can choose if you want to deliver the course for free or to request a fee. In the first case, you can decide an enrolment duration that will limit the time students have access to your content.
In the second case, you will be redirected to the “setting” section for defining the payment methods.
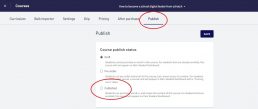
In the “Publish” tab, you can define the course status: draft, pre-order, published. When you click published, your students can purchase, enrol in, and access the content of the course. For students that are enrolled, this course will appear on their Student Dashboard.
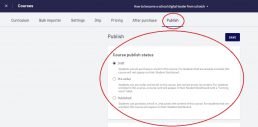
When finished, just save.
Now, you should start customising your site. To do it, you can open the menu “Design your site” on the left bar.

By opening the “Site Builder” app, you can customise contents and design of your pages.
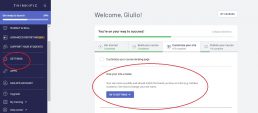
Clicking on “Home page”, you should firstly answer the question below.
For this example I chose “only one course” and then click on “Let’s go!”


At the moment, we will focus on the Home Page.
The customisation of the tabs “Home page” and Courses is more than sufficient for users approaching Thinkific for the first time. As you become more experienced, you will be able to set up all the other elements, if needed.
It is important to highlight the two main areas enabling the customisation of your pages: the “Pages” and “Theme Settings” tabs.
In the “Pages” tab, you can customise the contents and some structural elements, in the “Theme Settings” tab, you can customise the design of your pages.
Our suggestion is to define the contents and structure before (“Pages” Tab) and then the design (“Theme settings” tab).
In the “Theme settings”, we suggest you to choose one of the three pre-defined Styles included. They will change the page design in a consistent way. Then it will be more easy to set the single design features, if needed.

Now, you can start designing your Home Page.
This will include all your information and courses.
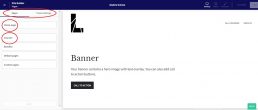
You can customise the header, the banner and the Product areas. They are the main 3 areas which will appear on your site. The header includes your logo and all the direct links you want to provide your learners (including the “Sign in” link).
The banner is the central part of your page and should include a description of your main proposal.
The last part includes a description of all your courses on Thinkific.
The very last part is the footer, which usually includes your contacts and social media, copyright notes and other links.
All the changes will be visible in real-time, so that you can explore and evaluate different solutions.
When you have finishes don’t forget to save the changes.
You can also create single pages for each of your courses. They are used for give to the learners an overview of your course and allow them to enrol. In most of cases if you want to deliver only one course you can focus only to this page. You should click on “Courses” and then on the course you want to create the page for.
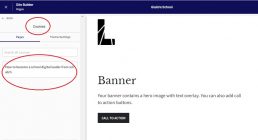
Here you can customise four main areas: heading, banner, curriculum and footer. The curriculum will be automatically generated based on the chapters and lesson you included in your course and the related features.
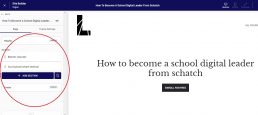
By clicking on the “+ ADD SECTION” button you can include a lot of different sections and contents to your landing page.
When finished, save your settings.
At this point, go to “Settings” and customise your site’s details.
In this section, you can define some details about your site, payment method, sign up and other elements.
What you have done so far is sufficient for publishing your first MOOC.
Now, open the “Manage Learning Content” section, go in “Courses” and click on your course.
Click on the tab “Publish” and then on “Publish”. Now your students can purchase, enroll in, and access the content of your course.
#3 Creating a Thinkific course: extra content
Creating Thinkific courses can be simple or difficult. The difficulty lies in the degree of complexity of the course we want to create. If your want a simple MOOC it will be very easy to achieve your goals. If, on the other hand, you want to create a complex educational path, you will have to apply yourself and study a bit further.
Learning how to use Thinkific does not require technical skills such as programming, it just requires commitment and passion. Try to take this new activity as such, study how it works, be happy with your successes and in times of difficulty just keep learning.

How to create and issue an open badge for free
How to create and issue an open badge for free
In this article, you will understand what the open badge is, how to create it for free and what the benefits are for you, as an organisation, and for the learner. More importantly, we will provide you with a short tutorial and extra resources to help you create and deliver your own open badge in a few simple steps.
If you want to go directly to the section “How to create and issue an open badge”, click here.
1. What to know about badges
Open Badges, offered by the Open Badges Infrastructure (OBI), are the new digital tool for mapping, acquiring and valuing a variety of skills, knowledge and experiences, both inside and outside traditional educational contexts. Basically, they are an online visual representation of a skill you have earned.
They are packaged in a digital file, represented by an icon. The file contains the description of the badge, who issued it and the criteria required to receive it.
As mentioned before, the advantage of open badges is that they can also be issued by non-traditional learning institutions or experienced providers. This means that they can also be used by any kind of organisation that wants to provide a sort of certificaton/reward for learning experiences.
In addition, badges can be issued for learning or achievement in any subject, and can be:
- Skill badges, which focus on professional technical skills
- Knowledge badges, for the acquisition of knowledge, sometimes in preparation for the application of that knowledge in skills-based badges.
- Social or life skills badges, to recognise students’ efforts to develop social and life skills that are not typically taught in the classroom but are important for a successful life.
- Identity badges, to become a member of a community.
- Certification badges.
2. How to get started
If your open badges will be issued in an educational or training context, before you start, we suggest you consider the following steps when designing your learning pathway.
- Determine skill or achievement to recognise.
- Establish criteria based on which the badge will be awarded.
- Design and issue the badge via a digital credential platform.
This last step may take longer for an inexperienced organisation due to the variety of tools available on the Internet.
We suggest you use https://badgr.io because it is open-source, free, easy to use, and with no limitations in numbers of learners or badges. Furthermore, it gives the possibility to design your badges.
3. How to create and issue an open badge with Badgr
Create an account and then login: you can create an account with some apps you already use (google, facebook, etc..) or use your email address.

In this case, a verification code will be sent to your inbox. Once you write the code, press “continue”.

At this stage, you have to fill in the form below and “Create an Account”

You will be redirected to the main badgr page.
At this point, you should scroll down and click on “View Badgr backpack” or just click on “Badgr personal”.

This is your personal Badgr area, where you can find the badges awarded to you through Badgr or add other badges awarded by external issuers.

Then, you should click on “Issuers”.

Click “create Issuer”

Fill in the info required, upload your Logo which will be a jpeg file (optional) and click “Create Issuer”

Now you are ready to create your first badge. Click on “Create Badge”.

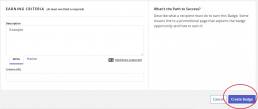
Fill in all the basic information required: the name of your badge, your badge image (.jpg file), description and earning criteria.
You can upload your badge image from your computer or you can choose to create an image directly on Badgr clicking on “design a badge”.

Once you are ready click on “Create Badge”.
Now your badge is created and it’s time to award it. If you want to award your badge one by one you can choose “Award badge” and fill in the required field (only email address and date are mandatory).
For multiple mailing you can click on “bulk award badge”, download the form and fill in it properly before uploading. The free Badgr version allows a maximum of 50 recipients per file.

The recipients will receive the badge via email. To fully exploit the potential of Badgr badges, the recipients should create a Badgr account. In this way, they will be able to download the badge, share it through social media and also print a certificate.
3. What are the benefits?
When accepted and used by all parties, open badges become a major channel of communication, establishing common standards and common language that define and describe personal and professional achievement.
For organizations, open badges help:
- identify quality professionals through recognized and substantiated skills and competencies
- monitor, support and evaluate the learning process
- build networks and connect organisations
For individuals, open badges are a way to:
- increase engagement in learning
- have a clear sense of its own learning progress
- serve as a good motivational mechanism
- display such skills and competencies, making them more visible in the job market.
4. Extra resources
Key badging terms
- Earner. An individual who satisfactorily meets badge completion criteria and is awarded the badge by the issuer
- Metadata. Every open badge is embedded with metadata including the badge name, description, criteria, issuer information, evidence, date issued, and other fields. Most badge issuing tools guide the issuer through the badge creation process and will indicate which fields of data need to be completed. Adding as much metadata as possible helps to increase the perceived rigor of each badge and its value to badge earners and consumers.
- Backpack. An earner-controlled digital repository that facilitates the collection, categorization, and sharing of open badges
- Issuer. The organization that designs and publishes a badge, reviews badge submissions, issues the badge to an earner, and provides digital verification of the badge’s authenticity
- Issuing Platform. A platform enables individuals and institutions to issue badges to their learners. In other words, if you want to give badges to your students, you create and upload your badges to an issuing platform, along with the criteria for earning the badge and a description of the badge.
- Open Badge Infrastructure (OBI). Open Badge Infrastructure—the technical standard for open badges developed by the Mozilla Foundation and maintained by IMS Global